
")
Making a NAP and HOLD pointed straight pyramid for spiritual development using wooden slats
Warnings
First of all, I would like to point out to all experimental readers that both the covered and uncovered pyramid skeletons move enormous energies. Besides helping to raise our energy levels, it can also overload us if we are not careful. Overcharging can manifest as headaches, malaise, nosebleeds. Because of the possibility of overcharging, it is important to monitor your energy levels at all times. If one feels that their body does not want to be in the pyramid, under the pyramid skeleton, do not force their intuition. For me, for example, during the preparations, after sleeping 5 nights in a pyramid, I always had to sleep somewhere else for a night or two. My son, then 12 years old, woke up with a nosebleed in the morning after 36 hours of filling.
The pyramid in our home can do other mischief. The pyramid throws out all the negative energy and radiation from the area bounded by the frame. This is the case, for example, with water vapour radiation. The energy and radiation that is thrown out of the pyramid is ejected along the diagonals of the pyramid's base. This also means that powerful magnetic energies are generated in this area, which can damage our electrical equipment. Experience has shown that a mobile phone placed outside the pyramid in the direction of the diagonal does not ring. The phone was at about the limit of its distance from the corner of the pyramid, corresponding to its diagonal.
If there is nowhere in your home without water-jet radiation, you can sleep anywhere in the home with the pyramid above the bed, because the pyramid will eject the radiation. That's why I started working with pyramids and pyramid energies in the first place. At one time I did a radiesthesia home survey and counselling. During this time I came across apartments where every square cm was covered with at least 3 layers of water vein. Virtually all filled in marshy areas that have been (irresponsibly) built on in the meantime. But I would like to draw the attention of anyone considering this solution. It is NOT a permanent solution, precisely because of overfilling!
The completed pyramid, when assembled, raises the vibration level of the dwelling and its occupants. The condition of the occupants must be taken into account when constructing the pyramid. In some cases, it may be possible to assemble the pyramid practically batten by batten. If a person claims to have a severe headache and has not previously had such a problem, it is necessary to postpone the construction or assembly until a later date when the headache will have subsided and will no longer occur. The resulting headache can be eliminated by grounding.
A little history
I published the first description of a straight pyramid made of wooden slats on www.andresi.hu (https://www.andresi.hu/energ/faPiramis.htm ) on 26 December 2010.
My friends and acquaintances suggested me to publish it, because they think that there is a lot of interest in pyramid building and that there are hardly any useful descriptions available. Before and after the publication, I built several pyramids with a base of 173 cm (sitting) and 220 cm (lying) for domestic or community use. The feedback I received was that my friends and acquaintances were right. Indeed, as requested at the end of the description, several people have reported back on the use of the description or asked questions.
The pyramid published there had one good and one bad feature.
The good part was that it could be tuned to multiple chakras. Primarily it could be used to tune and strengthen the lower chakras down from the heart chakra.
Besides the good part, the bad part was that it attracted a lot of astral beings. Although, for what it's worth, it had a good effect too. Because I became more sensitive to the expected appearance and presence of astral beings. In time, solutions for blocking astral beings also came from several sources. For example, from Hajnalka Túró that a permanent magnetic bracelet placed on the top of the pyramid would solve the problem. Although he had problems assembling and disassembling the pyramid. The latter problems were only answered when I got into the subject of the design of the pyramid's tip. Which was also thanks to a pyramid builder, Martina Beke.
I would also like to take this opportunity to thank Martina Beke and Hajnalka Túró for their selfless help, for their thinking together, for their support and for their help.
In the description of the Soul of Pyramids, my solution, published in 2010, is called NAP. In the same description it is type 4. From the investigation, it turned out there is a better solution. If I rotate the energy in the opposite direction in the tip of the pyramid. The latter corresponds to type 5 in the description. It is called HOLD.
I recommend this HOLD tip pyramid solution to practically everyone since the appearance of the HOLD tip pyramid. Primarily because of the problem of astral beings.
Today we find out that when the NAP tip pyramid is assembled, when does the gateway open for astral beings? When you put the 3rd edge next to the 2 edges. So the correct order of assembly is to put the protection on first after connecting the 2 edges and then proceed to insert the edges. In case the 4 edges are not joined. If the 4 edges are joined as recommended in the description, it is not advisable to move the protection from the tip of the pyramid until it is completely joined.
In practice, the protection allows the passage of the NAP tip pyramid to open outwards instead of towards the pyramid we have made. So astral beings cannot enter through it.
I covered the pyramid frame with a rubberized sheet at the beginning of my experiments. However, this covering has no meaning. The uncovered frame generates pyramidal energies of the same strength as the covered version. So I abandoned the rubberized sheeting on my pyramids over time.
The NAP and HOLD tip pyramid
The only difference between the two pyramids is the design of the tips of the edge slats. In the length and the design of the slats. Their effect is different.
Features of the NAP-tipped pyramid
As we discussed earlier, the NAP tip pyramid primarily affects the chakras. It can be used to strengthen, cleanse and unblock the heart chakra and the solar plexus chakra. Another characteristic of this solution is that it can only be used within the pyramid. Its effect is not felt outside the pyramid. I recommend it primarily for sitting pyramid purposes. But ...
Features of the HOLD tip pyramid
The HOLD tip pyramid works only on the heart chakra. Its effect is felt both inside the pyramid and in its surroundings.
Gate opening
Each pyramid opens a gateway to another dimension. At least one.
If you are working with a certain rectangular base (shorter side less than or equal to 2 times the longer side) or at least 5 pyramids, then more than one gateway opens to a pyramid (details are still being researched).
- The NAP pointed pyramid opens a gateway to the 4th dimension, Astral Plane, so I have NOT recommended its use for a long time.
(Some people have ordered one, but then realised they couldn't handle the mass of astral beings coming through.)
- The pyramid with the HOLD tip opens a gateway to the 7th dimension.
The solution also chases away the astral beings already present. Its effect on astral creatures and its external perceptibility allows it to be used for small scale defense. For example, to protect our children. The 13 cm mule pyramid solution shows the importance of this.
Attention! - There are many different kinds of creatures not visible to the normal human eye. Among them, for example, invisible snakes are not affected by the HOLD tip pyramid. But the Naga, for example, is a family of snakes who have passed on to mankind a great deal of doctrine that has uplifted mankind. For example, the teachings of the Siddhis originated from them (See Pal Pandian's work, also published in English.) Or, according to legend, the temples of Angkor in Cambodia were built by the Nagas. At present, it is believed that there is no Naga present on Earth who is in contact with his distant clan and represents a high level of knowledge.
The construction of the pyramids of NAP and HOLD
Since there is a solution for NAP mountain against astral beings, I think it makes sense to include the plan for the construction of the NAP mountain and the HOLD mountain straight pyramid.
This is a description of the implementation of straight pyramids. It gives an example.
The straight pyramid works all the more efficiently:
- the more regular the shape of the cone (symmetry of the basic square and vertex design) and
- the more precisely it is oriented.
Here, even a small angular rotation results in a significant energy reduction.
Basically I work with two different pyramid sizes. The first one I have built- is primarily for (lotus, Turkish) seating. The advantage of this solution is that the centre of pyramid energy is strongest in the vicinity of our power centre (solar plexus?). It is from here that the effect is developed. However, if someone wants to sleep in it, it is not a good idea because you cannot fit parallel to its side. Only diagonally.
Over time, I have therefore developed a second, now larger solution, so that you can sleep in it parallel to the sides. It's just "coincidental" luck that the centre of gravity of the larger pyramid is at the same height as the heart chakra.
Making our pyramid
For single use, the 2x2 pine slats worked perfectly. If possible, choose straight slats. We have already determined the lengths of slats needed. We will need 8 slats in total. 4 for the base edge and 4 for the side edge.
Start with the base edge
That is, the square that will form the base of the pyramid. For both tip types the pyramid base is the same.
The completed pyramid can be fixed or mobile, i.e. transportable. In the latter case, it is good not to glue the parts together.
In the fixed case, the structure is more rigid and stable if the parts are glued together.
Attention! - If you have your pyramid made, ask the contractor to fit the base edge slats at 45º! Otherwise our pyramid will not move harmonious energies. With the slats at 90º, the energies generated are unbearable!
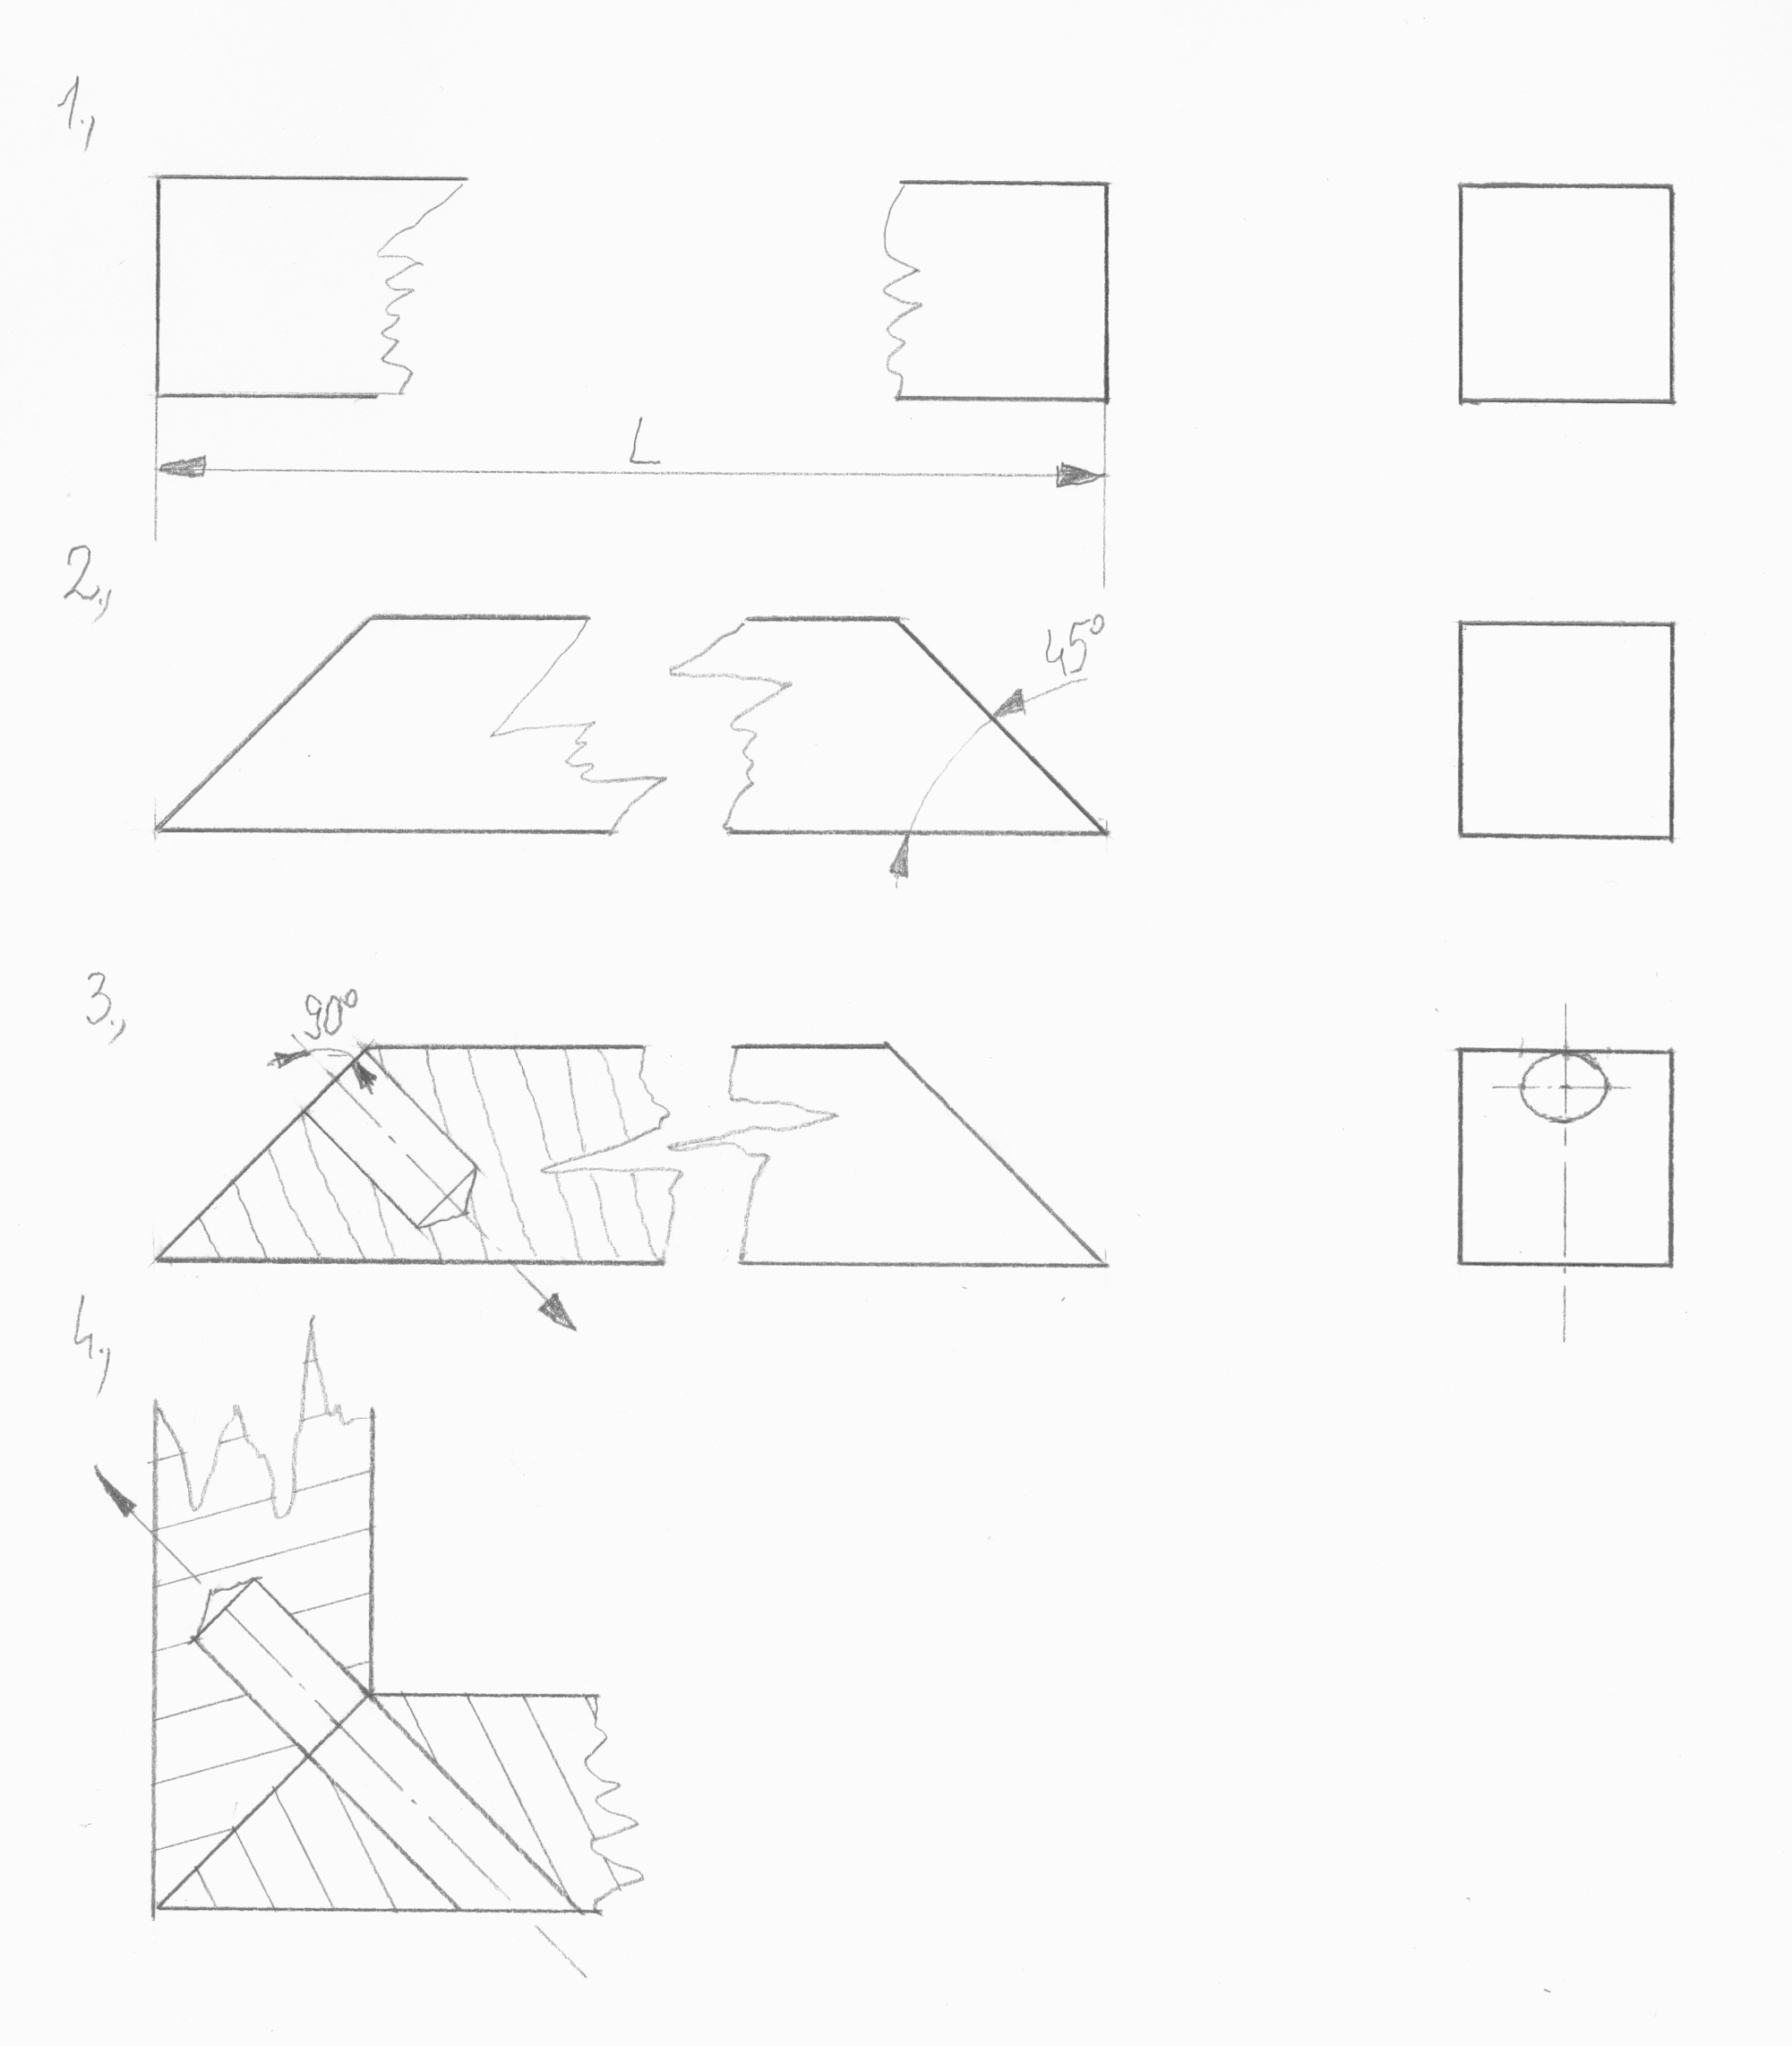
Figure 1 - Sequence of operations to form the base edges
The proposed sequence - numbering as in the figure - is as follows:
Cut the wooden slats to size (L).
Cutting the ends of the cut-to-size battens at 45°
Drill a through hole 8 mm in diameter in one end of the slats in the direction of the arrow
Count the number of matching battens and make the 8 mm diameter through hole in the direction of the arrow.
Figure 2 shows a simple solution for drilling the laths after they have been matched.
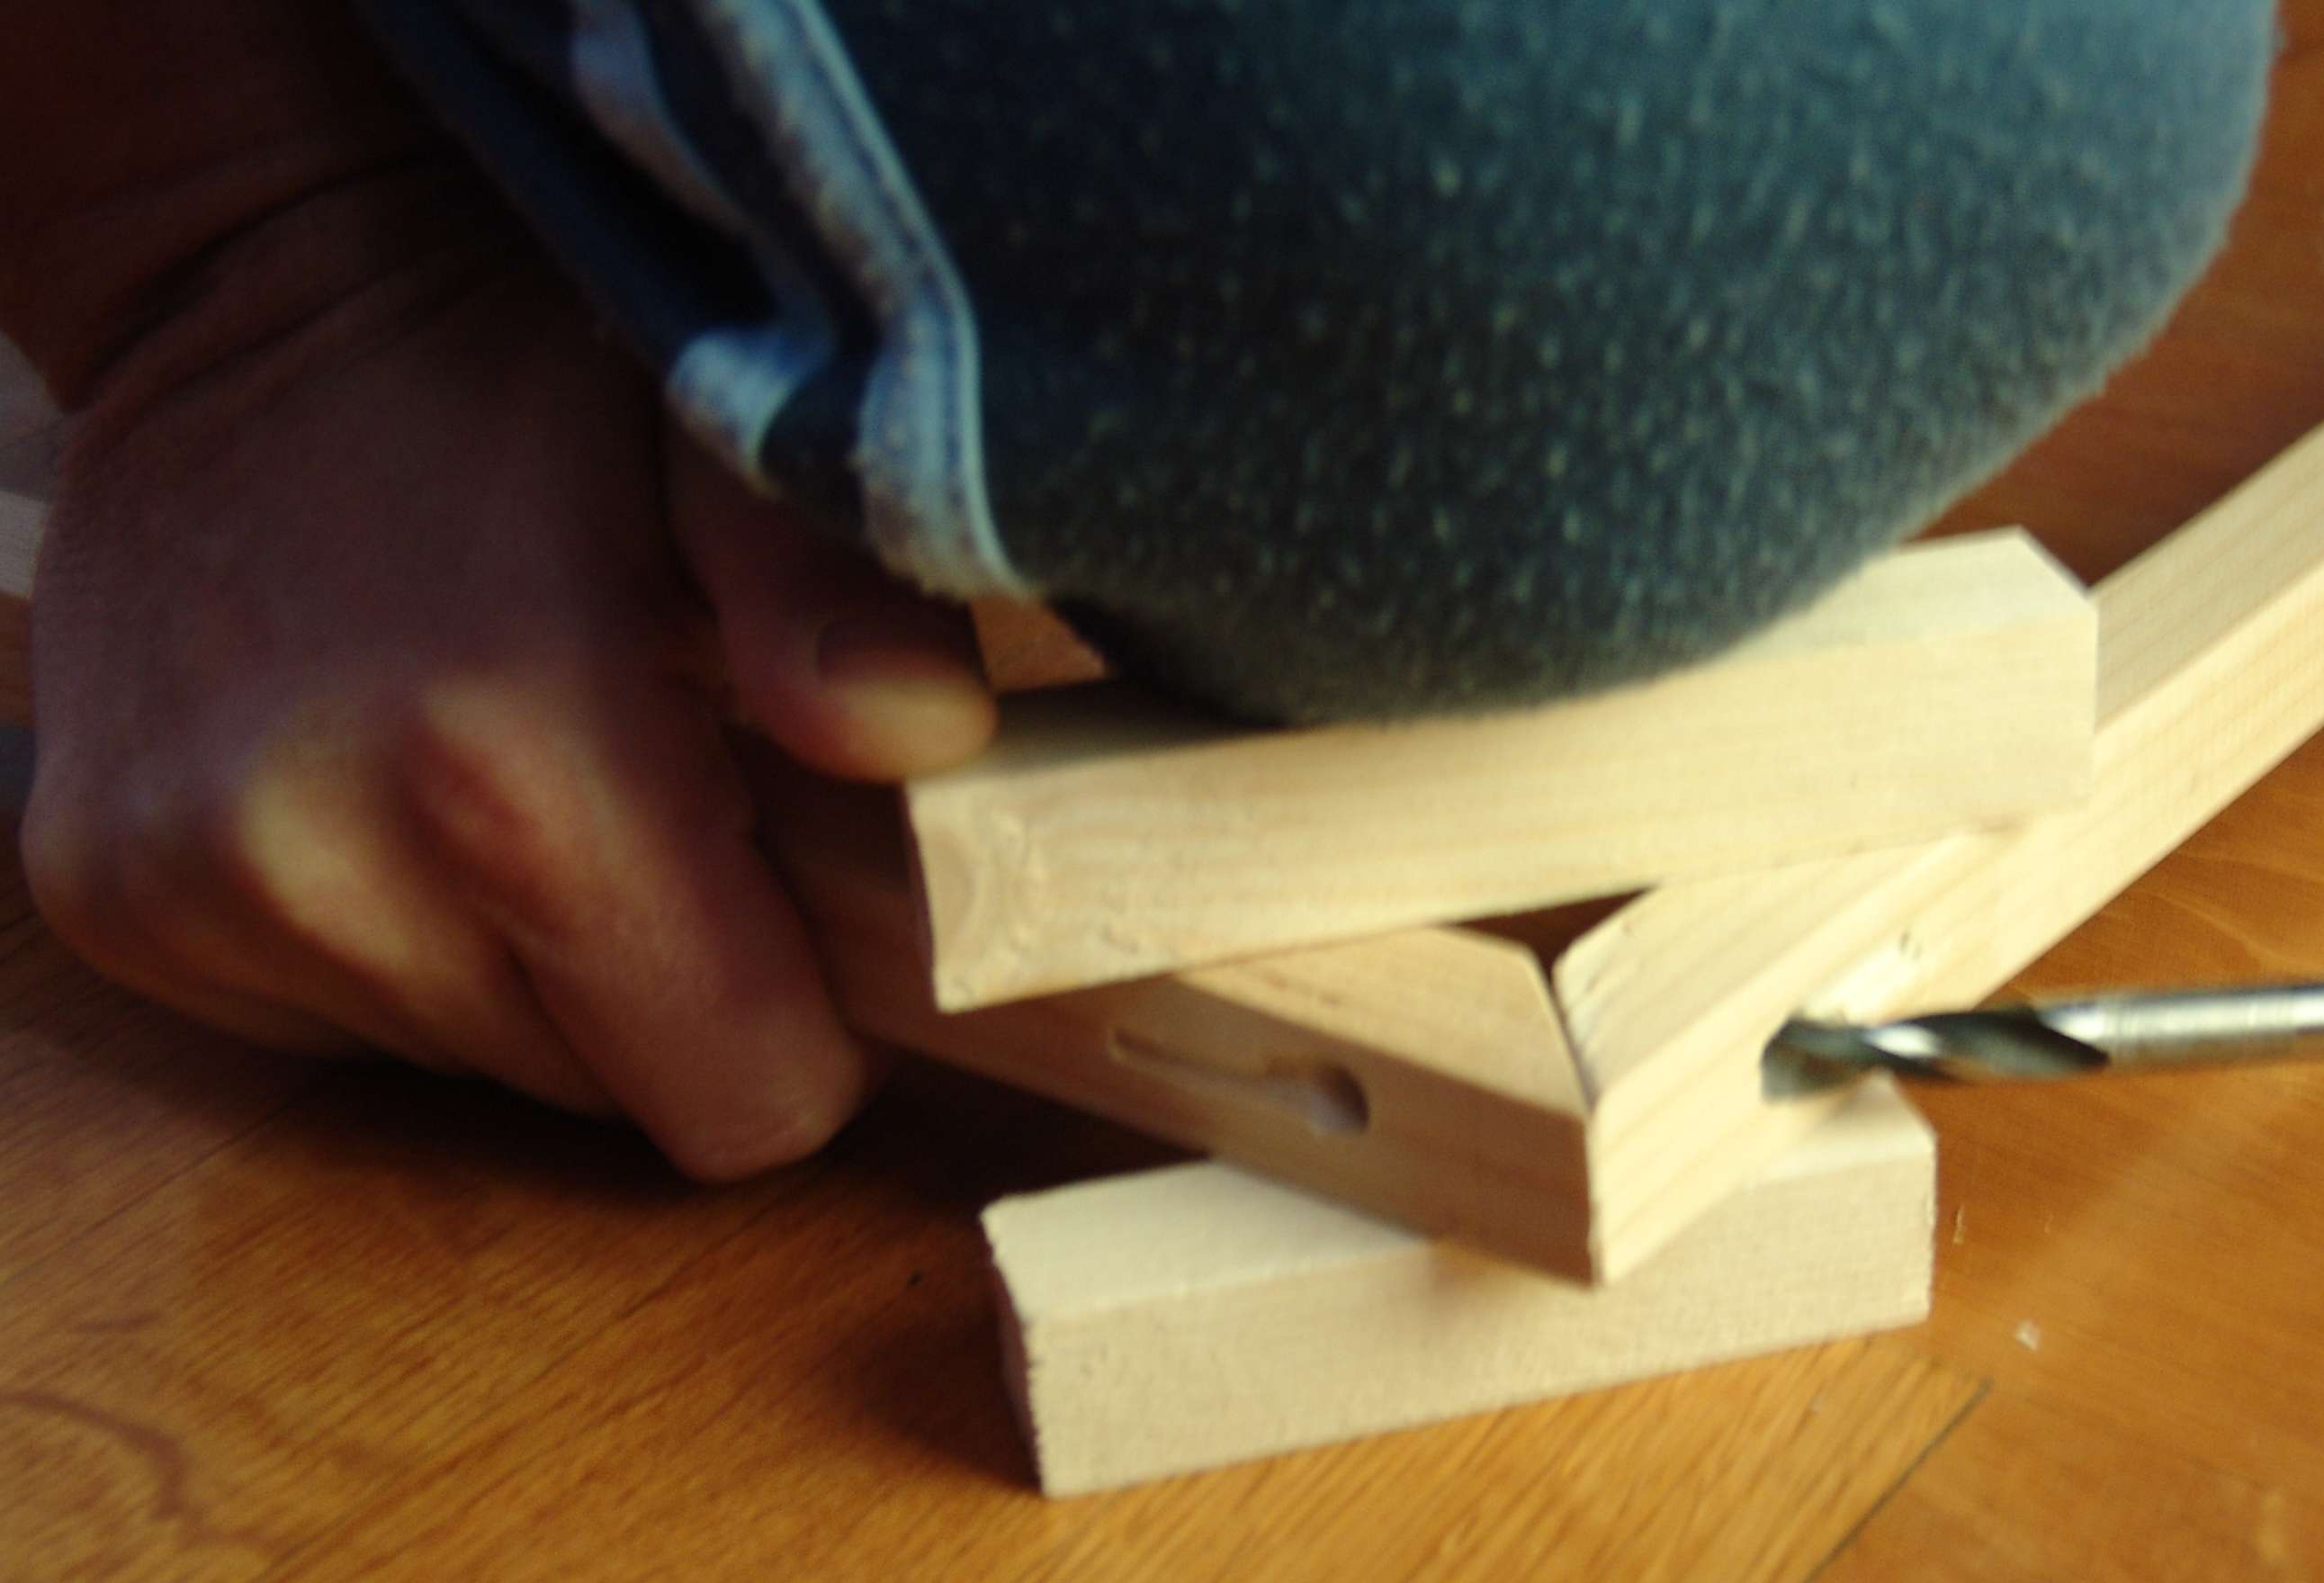
Figure 2 - How do we drill the matching batten?
The sequence of operations does not include sanding through the finished slats to avoid getting splinters in your hands during use.
It is easier to start drilling at right angles than at an angle. See drilling in step 3. In the next step, you want to drill the two joined battens together, forming the corners of the basic square. Here, the hole we made in step 3 can now guide our drill. This means that the two holes will definitely fall in a straight line. We will have no problem joining the diameter 8 wooden pegs. Cut a tap large enough so that the two ends of the tap extend beyond the two slats. Perform this operation by fitting the 4 base edges.
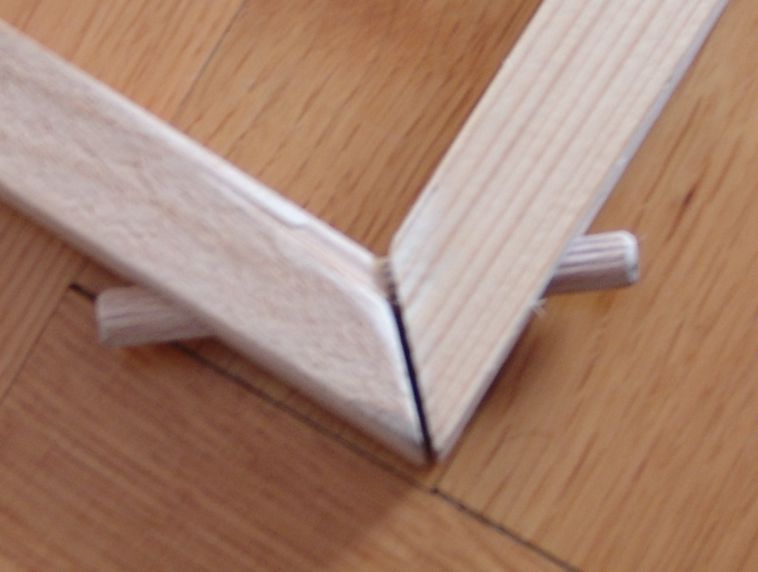
Figure 3 - Alignment of the base edges, including the pin
Preparing the side edges
The side edges rest on the corners of the base square at one end. This end configuration is the same for the NAP and HOLD tips.
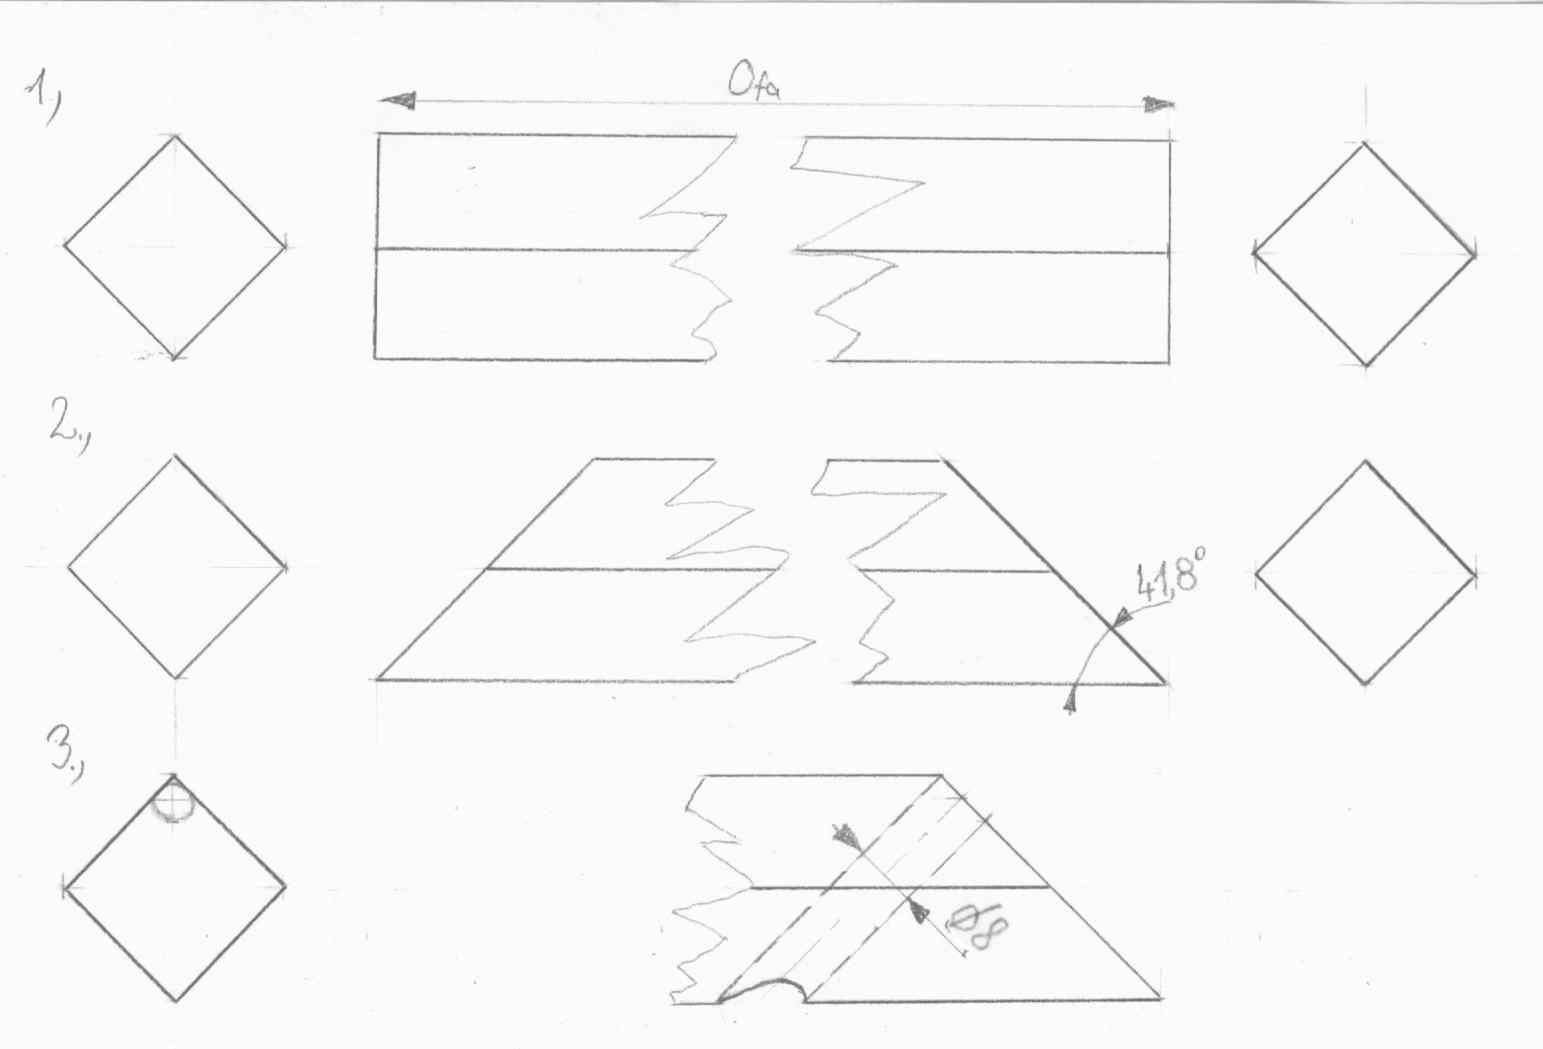
Figure 4 - Sequence of operations to prepare the side edges and the end to be connected to the base
The suggested sequence -sequence numbering as in the figure- is as follows:
Cutting the wooden battens to size (Ofa).
Cutting one end of the cut-to-size battens to 41.83° and the other end to 48.17° (if you can only set 45° on your mitre saw, that's fine). The 41.83° end is attached to the base, i.e. where the 8 mm diameter hole will be drilled.
When sawing the side edges, make sure that the batten is on edge and that the bend angle of the sides is 45°. (When cutting the base edges, we got pieces with this 45° bend angle, which we can now use to support the side battens.)
Make a through hole 8 mm in diameter in one end of the battens in the direction of the arrow.
This end will join the bottom square.
Insert a pin into the hole so that it extends about 1.8 cm beyond the bottom side and about half a cm beyond the other side.
The other ends join together to form the top, apex point of the pyramid. The NAP and HOLD tips are mirror images of each other. But for clarity, I'm including a 2D drawing of both.
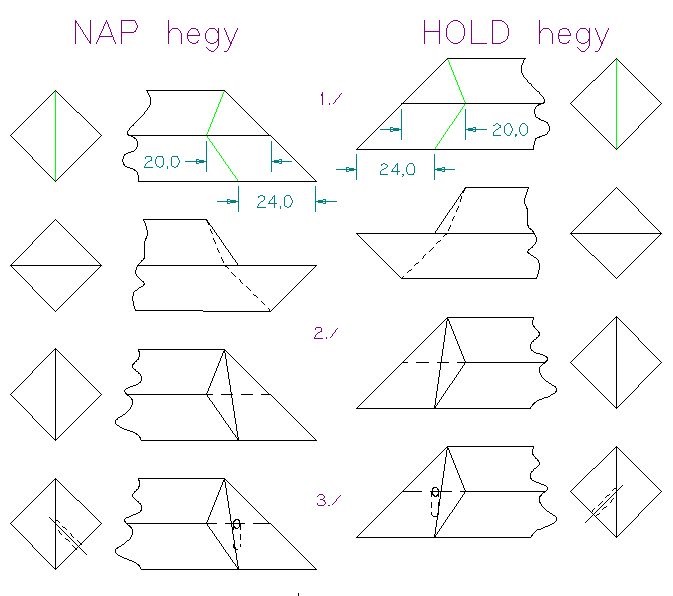
Figure 5 - Shaping the top of the side edges
Drawing of the parts to be cut. (Shown in light green.)
Shaping the self-locking tip.
Preparation of a 2 mm diameter hole to enclose the self-locking tip.
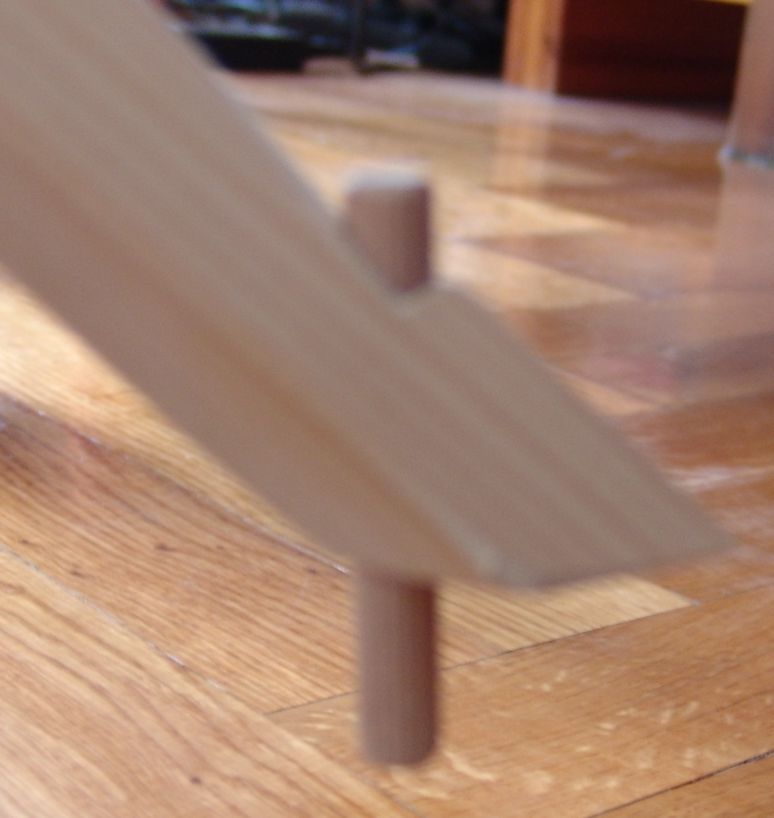
Figure 6 - The bottom design of the side slat with the pin included.
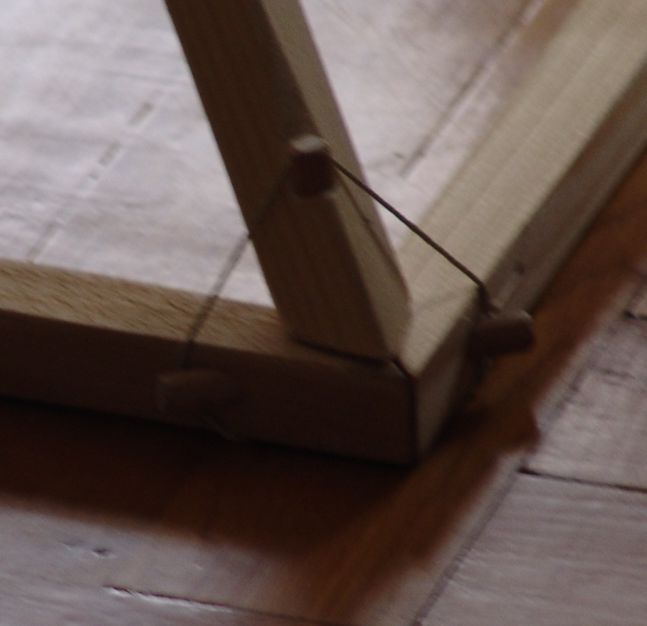
Figure 7 - Meeting of lower edges and side edges
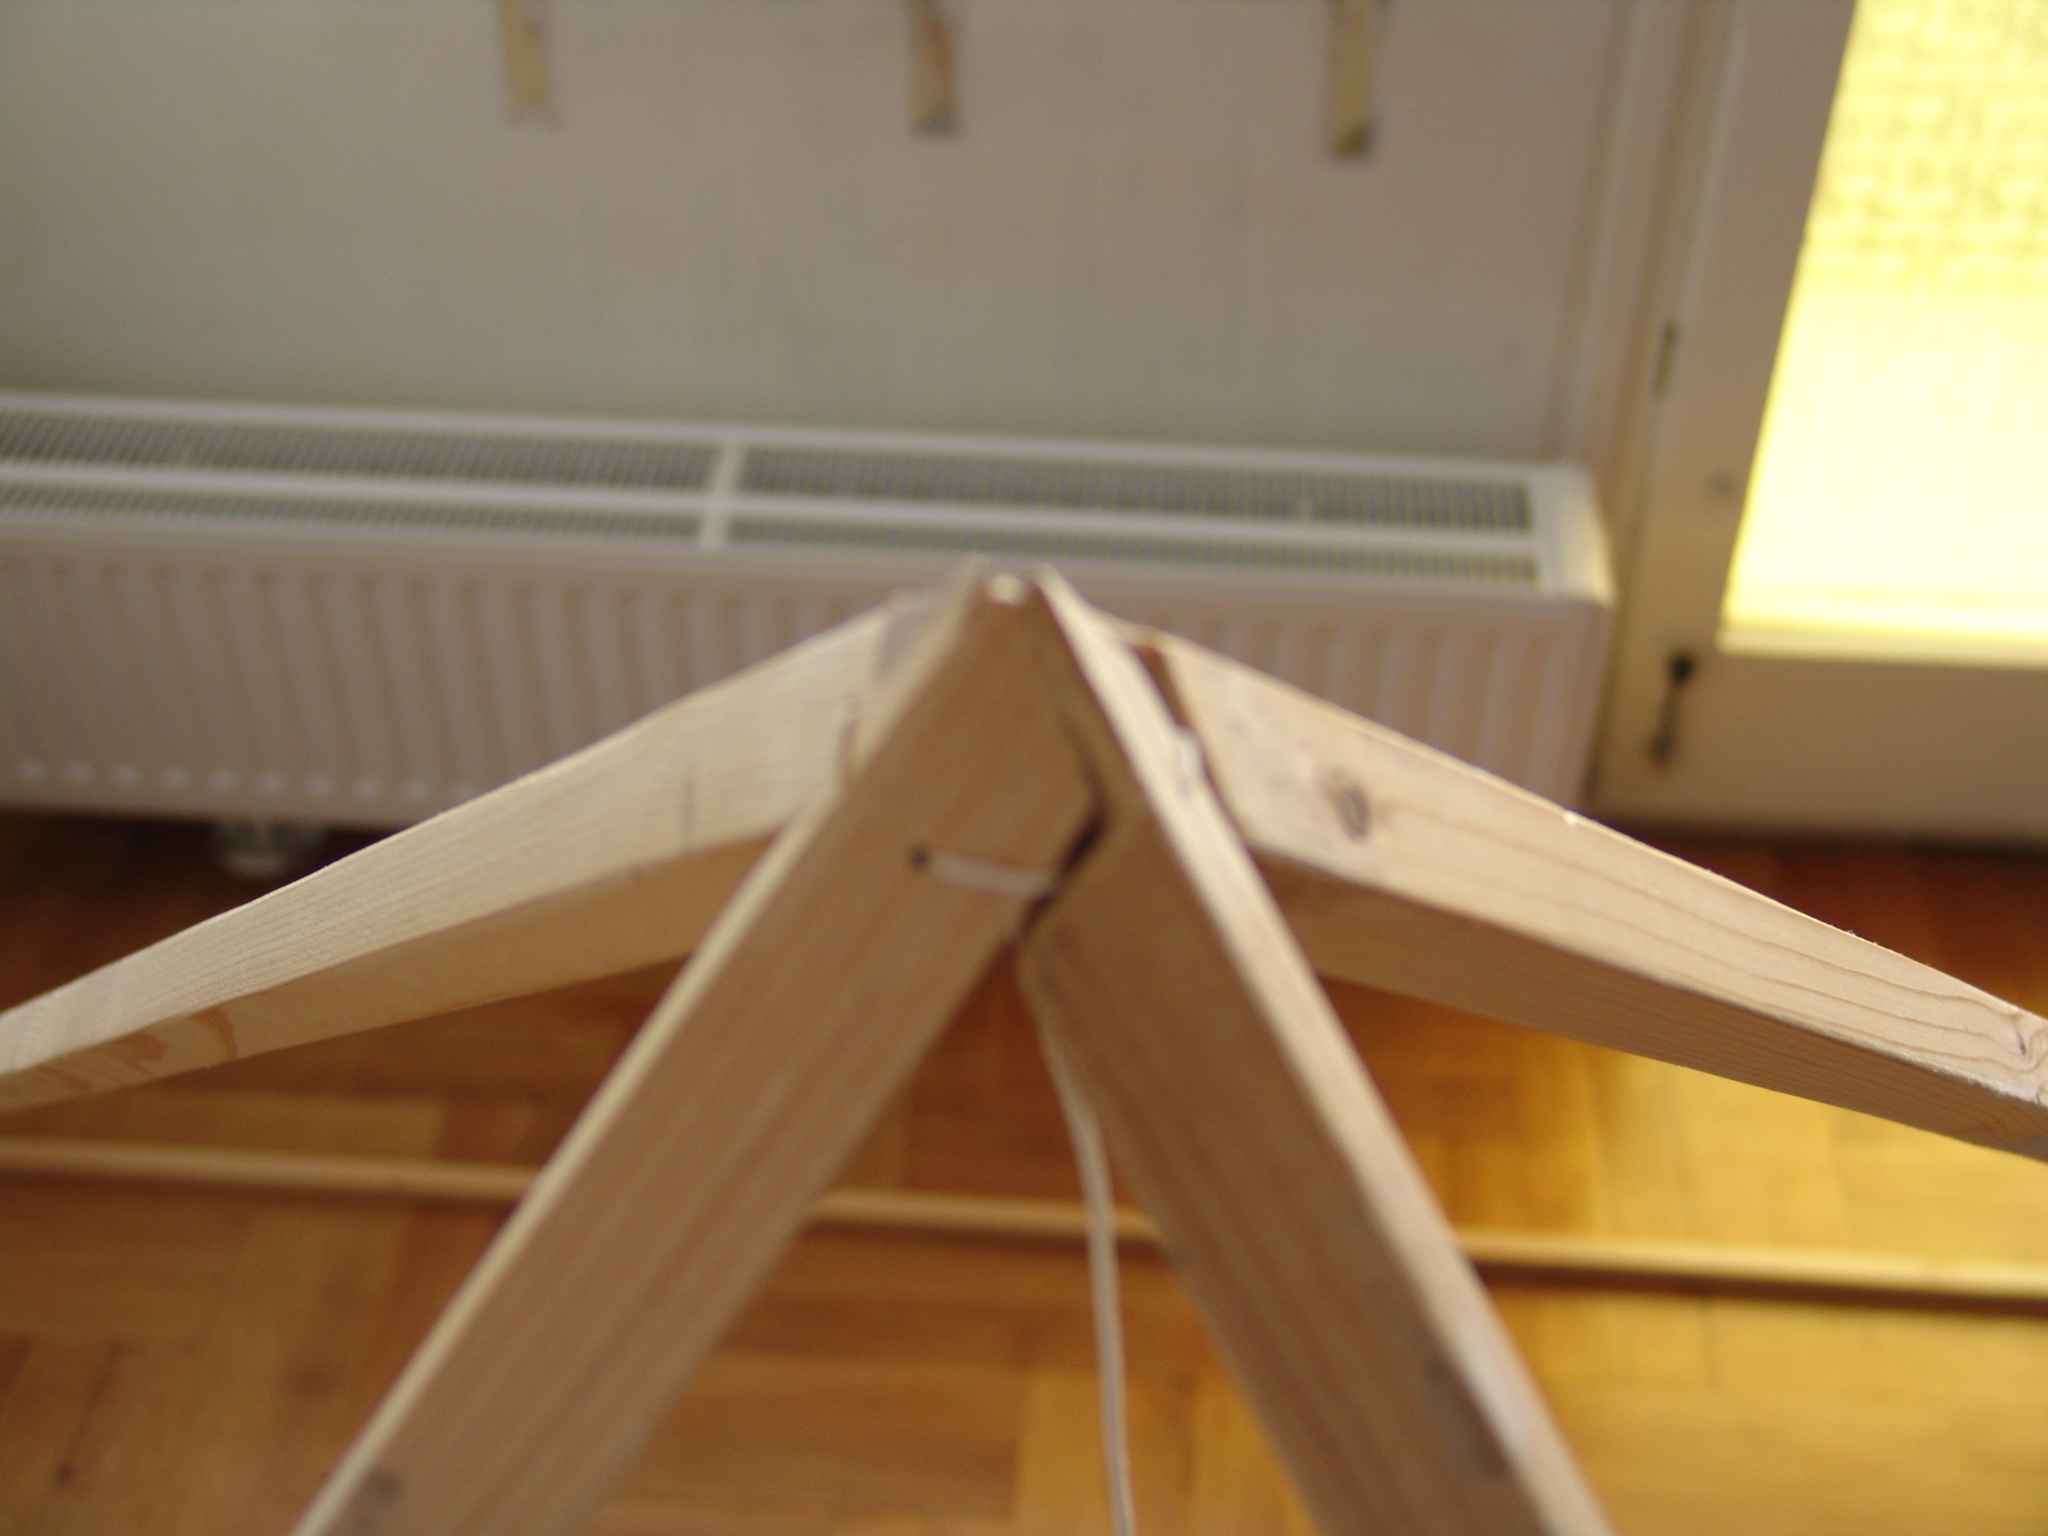
Figure 8 - Lateral view of the upper NAP tip
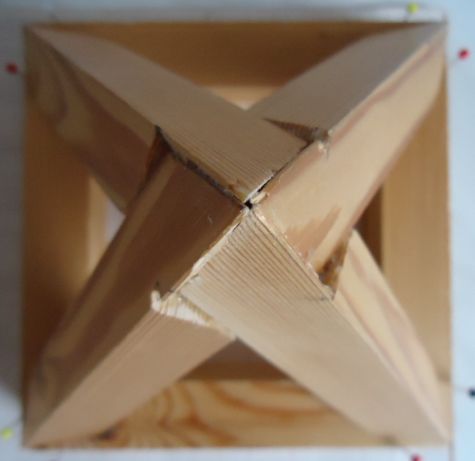
Figure 9 - Top view of the HOLD tip
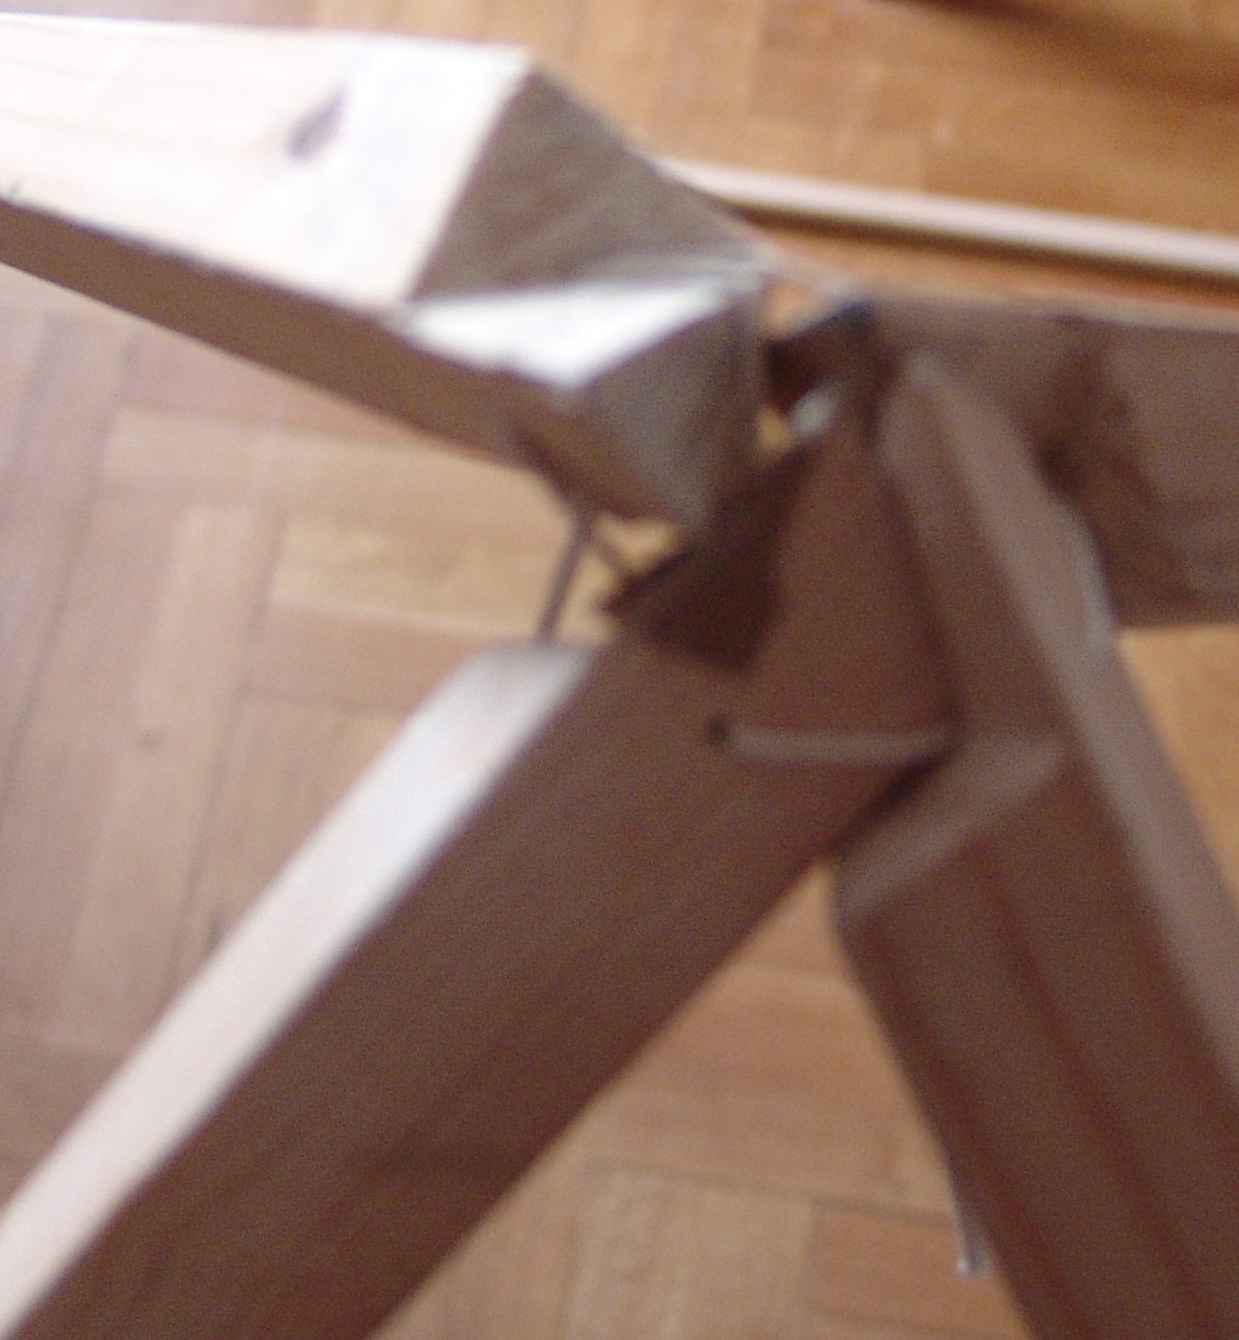
Figure 10 - The split upper vertex
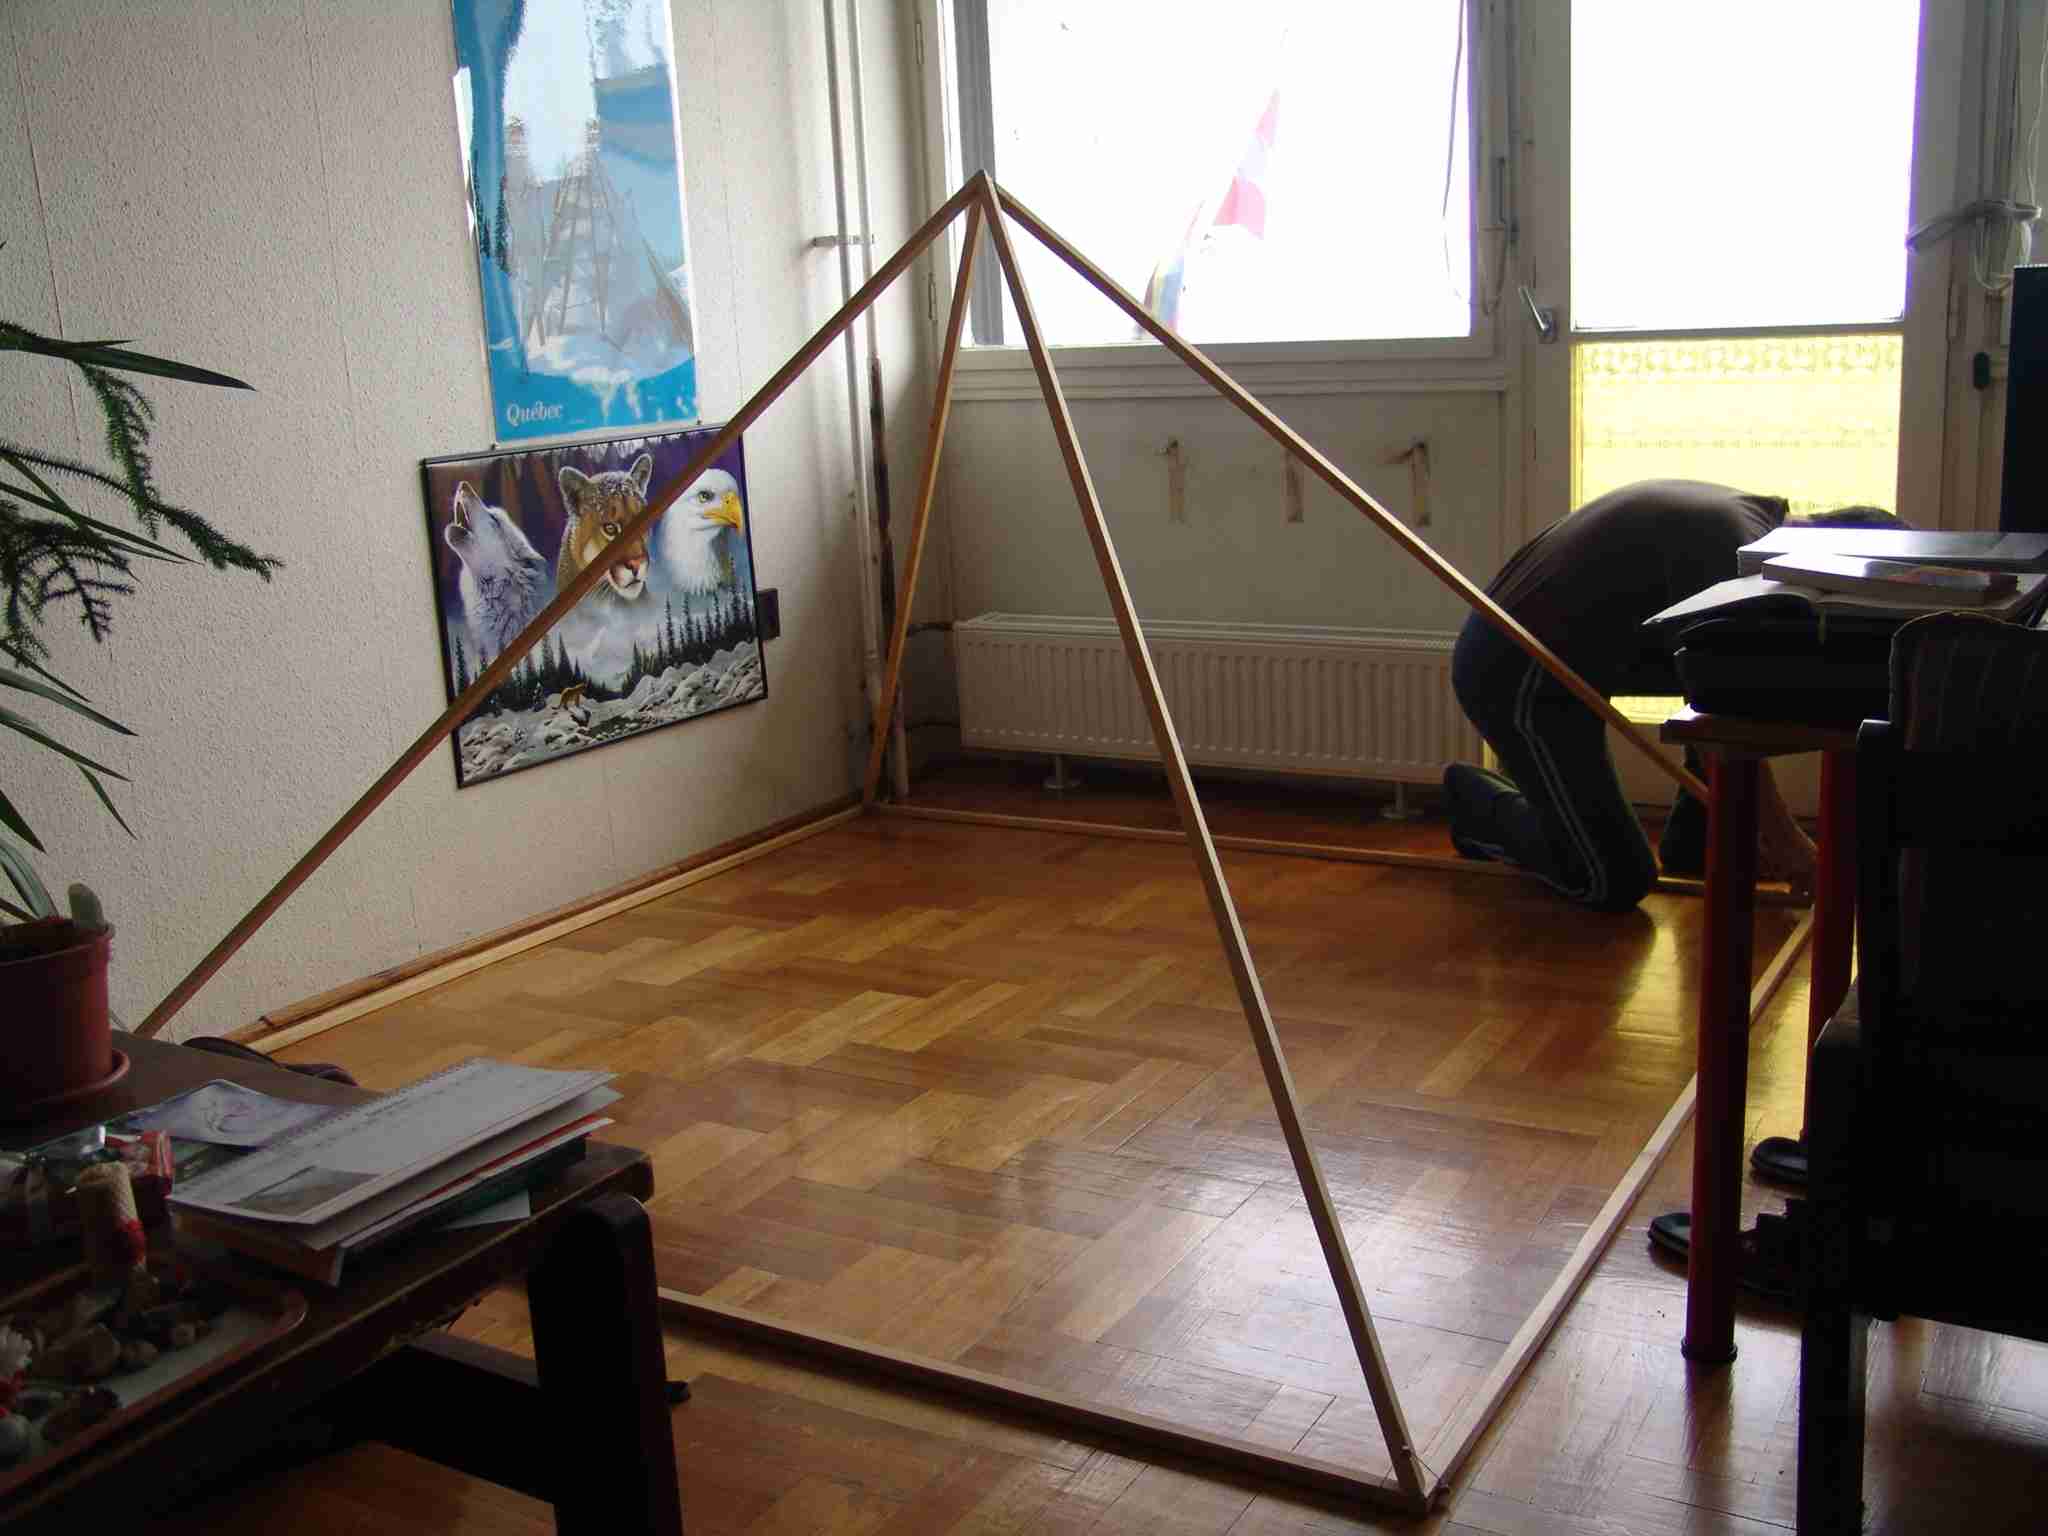
Figure 11 - The assembled pyramid
If you use the pyramid alone, you are practically done.
Although, for ease of assembly and erection, it is recommended to fold the top tip. See Figures 8, 10.
Attention! In case of NAP tip design, it is recommended to put up the protection at the right time to prevent the appearance of astral creatures! For details see earlier in this description!
Good luck with the construction! If anyone has any questions, ideas for further development, experience, or if you have built your first piece based on this description, please send me an email.
If you can't make it according to the description, or if you don't have the right tools or experience, I will be happy to make it for the price listed in the "Promotions and prices" section of the "Designing and making pyramids" page.
Thank you!
Dear Reader!
I'd like to ask you, if you use these results, to include the source in the place of use.
Thank you!
Yours sincerely, Attila Andrési.
Please send me a letter via the e-mail address provided on the Contact page.
